
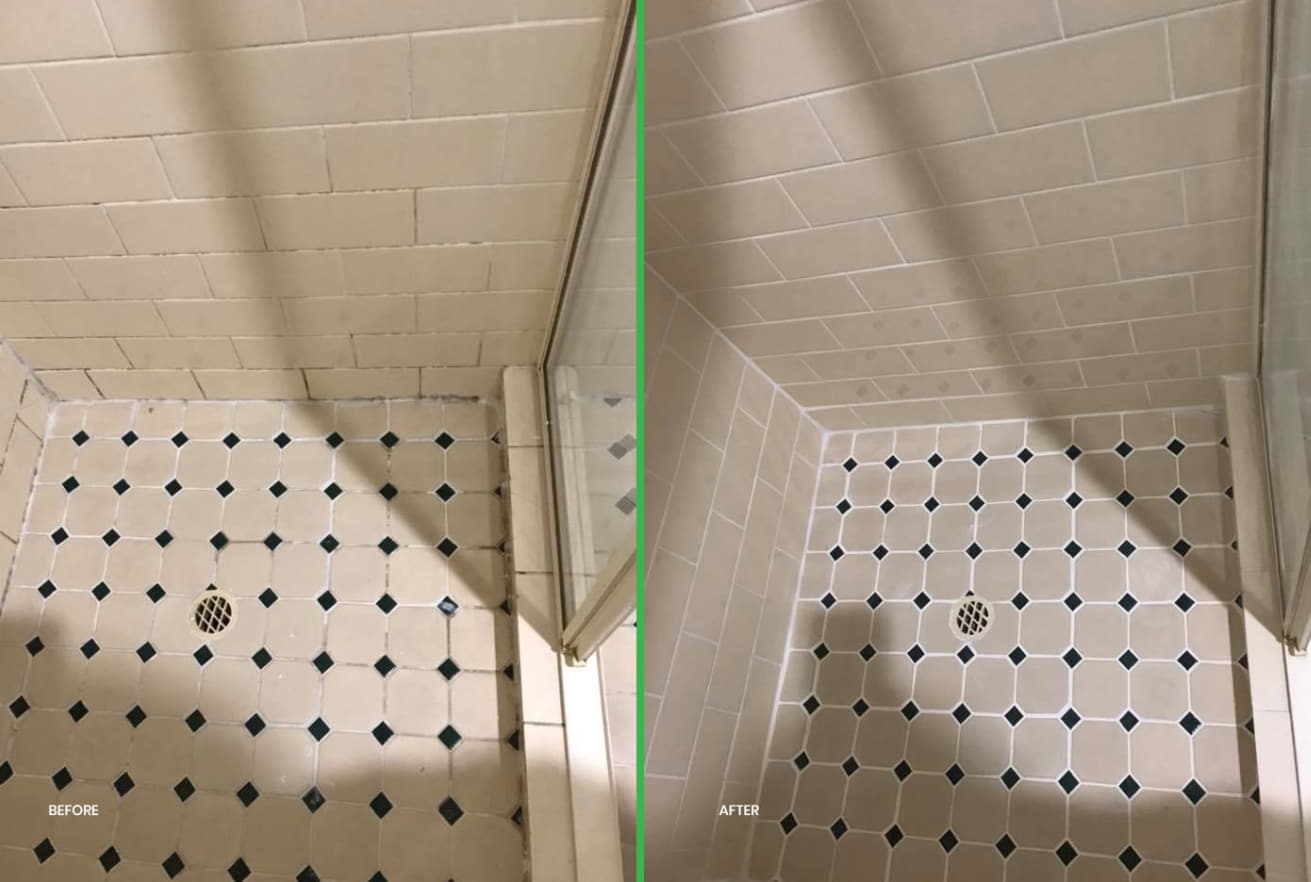
How to Revitalize Your Bathroom with Shower Regrouting in Brisbane
Over time the grout in your shower area may become discoloured, cracked, or even mouldy, detracting from the overall beauty and cleanliness of your bathroom. If you’re in Brisbane and looking to revitalize your bathroom, shower regrouting is a cost-effective and impactful solution. In this article, we will guide you through the steps to revitalize your bathroom with shower regrouting in Brisbane.
Step 1: Assessing the Condition of Your Shower Grout
The first step in revitalizing your bathroom is to assess the condition of your shower grout. Check for signs of discolouration, cracks, or mould growth. If the grout is severely damaged or has extensive mould, it may be necessary to completely remove and replace it. However, if the damage is minimal, regrouting can be a suitable option to restore the appearance and functionality of your shower.
Step 2: Gathering the Necessary Tools and Materials
You will need a grout removal tool, such as a grout saw or rotary tool, to remove the old grout. Additionally, you will need new grout, a grout float or trowel for application, a sponge or cloth for cleaning, and a grout sealer to protect the new grout from stains and moisture. Ensure you have all these items on hand before proceeding.
Step 3: Removing the Old Grout
Using the grout removal tool, carefully remove the old grout from between the tiles. Take your time and be cautious not to damage the tiles themselves. It’s recommended to work in small sections to maintain control and avoid accidental slips. Once you have removed the old grout, thoroughly clean the area to remove any debris or dust.
Step 4: Applying the New Grout
Prepare the new grout according to the manufacturer’s instructions. Using a grout float or trowel, apply the new grout into the gaps between the tiles, ensuring it fills the entire space. Hold the float or trowel at a 45-degree angle to push the grout into the gaps and remove any excess.
Step 5: Cleaning and Sealing the Grout
After applying the new grout, wait for the recommended time specified by the manufacturer. Then, using a damp sponge or cloth, carefully clean the tiles, removing any excess grout on the surface. Take care not to remove the grout from the gaps. Once the grout has fully cured, typically after 24-48 hours, apply a grout sealer to protect the new grout from stains and moisture.
Step 7: Maintaining Your Revitalized Shower Grout
- Regular Cleaning: Incorporate regular cleaning into your bathroom routine. Use a mild, pH-balanced cleaner to clean the tiles and grout. Avoid harsh chemicals that can damage the grout or strip away the sealer.
- Wipe Down After Each Use: After each shower, wipe down the tiles and grout with a soft cloth or squeegee to remove excess water and soap scum. This prevents the buildup of grime and reduces the chances of mould growth.
- Avoid Abrasive Cleaners: Avoid using abrasive brushes or scouring pads on the grout, as they can cause damage. Stick to soft sponges or brushes specifically designed for cleaning grout.
- Address Issues Promptly: If you notice any cracks, discolouration, or signs of mould returning, address them promptly. Early intervention can prevent minor problems from escalating into more significant issues.
- Periodic Sealing: Periodically reapply the grout sealer to maintain its protective barrier. How often you need to reseal depends on the type of grout and the manufacturer’s recommendations.
- Use Grout-Friendly Products: When selecting bathroom cleaning products, opt for those that are labelled as safe for grout. These products are less likely to cause damage and will help preserve the grout’s integrity.
Conclusion
Revitalizing your bathroom with shower regrouting in Brisbane is a rewarding and cost-effective solution to bring back the beauty and cleanliness of your shower area. Don’t let deteriorating grout diminish the appeal of your bathroom any longer. With shower regrouting, you can enjoy a refreshed and inviting space that adds value to your home.